Update SSL Cert on Azure App Service
There are so many different tutorials on how to provision and install an SSL/TLS certificate on Azure App Services that I thought I’d write one that worked for me. I added some indicative timelines so you know how long each step may take. As a rule I recommend starting this process at least a week before the current certificate will expire.
Pre-requisites
Find a different tutorial if you don’t have these exact components because your results may vary:
- Windows computer (Windows 10 or newer, or a server edition)
- DigiCert Certificate Utility
- Azure App Service that requires a SSL certificate to be updated
- SSL certificate available to purchase
- Access to domain name DNS settings
Create certificate
Generate CSR (5 minutes)
- Open the DigiCert Certificate Utility and follow the official steps to generate a CSR
- Remember to put a wildcard URL if you are purchasing one.
- The important thing is you don’t need to generate the CSR on the server that you’re going to install it on.
Purchase certificate using CSR (10 minutes)
- Purchase the certificate with the CSR generated from DigiCert Certificate Utility. This step is largely similar with all certificate sellers.
Verify domain ownership via DNS (up to 1 hour)
- As part of the certificate generation process you will need to verify domain name ownership. I recommend using the DNS method, where you add a TXT record with a provided string. This part may take an hour or more to propagate, but is usually faster.
Download certificate (5 minutes)
- The SSL provider will e-mail the certificate in text format.
- Copy the certificate text into a text editor and save it with a .cer extension.
Convert certificate into .pfx (10 minutes)
- Open the DigiCert Certificate Utility on the same server you generated the CSR.
- Import the .cer file into the server following the installation instructions.
- Next, export it as a .pfx file following the export instructions.
- Store the password for the .pfx in a secure manner.
Install certificate on Azure App Service
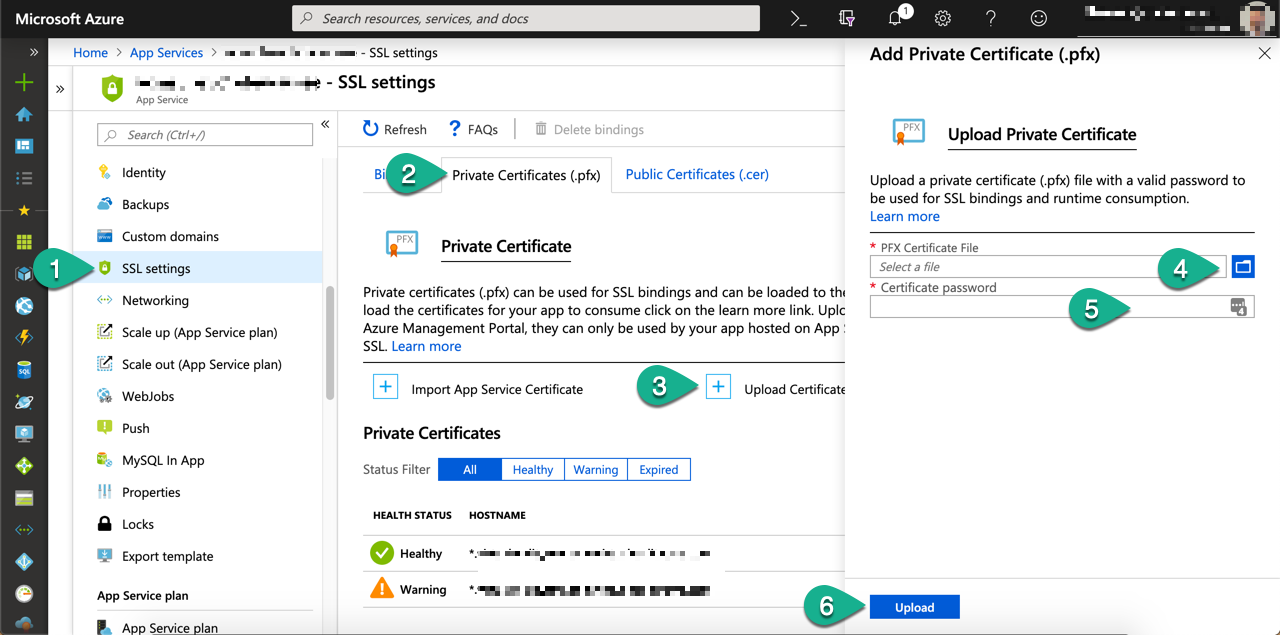
Upload PFX certificate to Azure (5 minutes)
- Go to Azure Portal and access one of the App Services you wish to update. Go to the SSL settings blade.
- Click on Private Certificate (.pfx) tab.
- Click on Upload Certificate button.
- Select the .pfx file exported from DigiCert Certificate Utility.
- Enter the password used to secure the .pfx.
- Click on Upload. This should take a few seconds. If the notifications say that it is still uploading after a minute, refresh the Portal and upload again.
Upload PFX certificate to Azure
Assign certificate to SSL Binding (5+ minutes)
- Go back in the Bindings tab.
- Scroll down to SSL Bindings section and update each binding with the new certificate.
- Browse to the site and confirm the new certificate is being used.
Refer to Microsoft documentation because the Azure UI changes often.
I hope this helps someone! Probably myself, in a year’s time.
Background photo credit: University of Glasgow Library on Visual Hunt / CC BY-NC-SA