Configuring Windows 10 IoT on Raspberry Pi 3
Configuring Windows 10 IoT is the next logical step after OS installation. These tips should apply to any of the boards supported by Windows 10 IoT, but I will focus on the Raspberry Pi 3.
Prerequisites
Windows 10 IoT is free, but you need a full Windows 10 desktop/laptop environment to get the most out of it. You can access the Pi’s web configuration page from almost any device, but certain steps require Powershell.
On-Device Configuration
There are some basic options you can change from within the default startup app. Since this is an IoT device I assume you have a network cable plugged in. This is especially important as there is no way to set the date/time directly. It will instead query a time server automatically, but I have found that it usually takes about 15 minutes for it to correct itself. This is slightly annoying since I don’t have a real-time clock on my Pi. Alternatively, you can also use the Powershell set-date command to manually set the date – useful if your device is not network-enabled.
You can access some basic settings from this default startup app. The Settings screen will allow you to do the following (as of May 2016):
- Connect to a broadcasted WiFi network (see below for tips on non-broadcast SSIDs).
- Activate Bluetooth (RasPi 3 on-board Bluetooth chip not supported as of May 2016).
- Set the time zone.
You should also note the assigned IP address on the home page.
Windows Device Portal
Windows creates a web configuration page on port 8080. You can browse to it and log in to the administrator account using the default password p@ssw0rd.
You will obviously want to change that default password immediately and the web configuration will allow that in addition to:
- Selecting output screen resolution (requires a restart)
- Running installed apps
- Install new apps via package uploads
- Selecting network connection profile
- Enabling Windows IoT Remote Server – a highly recommended step during debugging and set up. This allows Remote Clients to connect.
You can get a comprehensive rundown over at Microsoft.
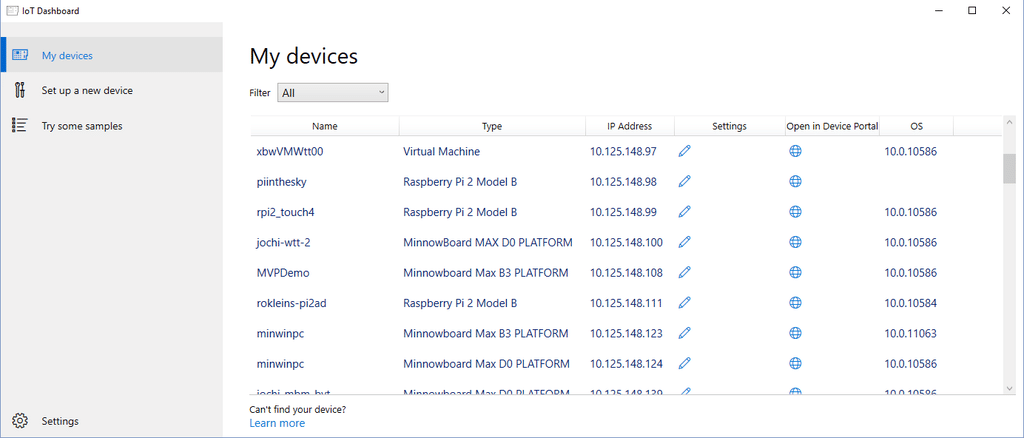
Windows 10 IoT Core Dashboard
This is a handy utility especially if you have multiple boards running Windows 10 IoT (lucky you!). You can find the download link in Microsoft’s guide. It lists all the discoverable Windows 10 IoT devices on the network and allows some basic configuration from within the app itself. It can also launch the web configuration portal to save you from remembering IP or machine names.
Windows 10 IoT Remote Client
Long story short: this is Remote Desktop for Windows 10 IoT. You can’t RDP into Windows 10 IoT (yet) but this app, which can be found in the Windows App Store, allows you to remotely view and control your Raspberry Pi. Highly recommended so you don’t need to connect a the RasPi up to any monitor or TV just to do some minor configuration.
Connecting to hidden WiFi networks
By ‘hidden’ I mean WiFi networks that do not broadcast their SSIDs. It’s a bit of a hassle at the moment as there is no interactive way to specify the SSID to look for. I needed to connect the RasPi to my work Wifi (which is non-broadcast) and I came across this excellent guide on importing WiFi profiles through PowerShell. Scroll down to the Option 2 heading and go from there.
That guide currently advises you to export the desired WiFi profile from the computer you are working on, in order to import it into the RasPi. However, my work PC does not have a WiFi adapter, so I worked around it by using PowerShell to export a saved profile on the RasPi itself. I opened it up in Notepad and tweaked the SSID and WPA2 key, saved it as the new profile’s name, and proceeded to import the profile using PowerShell.
In case that did not work, here’s a template you can use to roll your own profile. Note that you will need to transmit the Wi-Fi key in plaintext.
<?xml version="1.0" encoding="US-ASCII"?>
<WLANProfile xmlns="http://www.microsoft.com/networking/WLAN/profile/v1">
    <name>SampleNonBroadcast</name>
    <SSIDConfig>
        <SSID>
            <name>SampleNonBroadcast</name>
        </SSID>
        <nonBroadcast>true</nonBroadcast>
    </SSIDConfig>
    <connectionType>ESS</connectionType>
    <connectionMode>auto</connectionMode>
    <MSM>
        <security>
            <authEncryption>
                <authentication>WPAPSK</authentication>
                <encryption>TKIP</encryption>
                <useOneX>false</useOneX>
            </authEncryption>
            <sharedKey>
                <keyType>passPhrase</keyType>
                <protected>false</protected>
                <keyMaterial> <!-- insert key here --> </keyMaterial>
            </sharedKey>
        </security>
    </MSM>
</WLANProfile>
Microsoft publishes different Wi-Fi profile samples if the above does not suit your Wi-Fi settings.
I hope the above tips and tricks helped you in configuring Windows 10 IoT for the Raspberry Pi 3. You can expect things to change as Microsoft is actively developing this area. Consider this more of a historical record of how the ‘early days’ looked like.
Next week: Developing Software on Windows 10 IoT
Photo credit: “The Wanderer’s Eye Photography” via Visual Hunt / CC BY-NC-SA